

Load Favorite Datasets
Summary
Keeps your most-used datasets in four lists that you name yourself, and adds any combination of them to the active map with one click. Any dataset a browse dialog can reach can be a favorite: feature classes, shapefiles, rasters, tables, layer files and online services alike. Find each one once, give it a description you will recognize, and from then on it is a check mark away, with no more hunting through folders and web servers.
The lists are saved with your Windows user profile, so the same favorites are waiting in every project. A dataset that has gone missing (a renamed folder, an unplugged drive, a server that does not answer) is shown in red before you try to load it.
An example
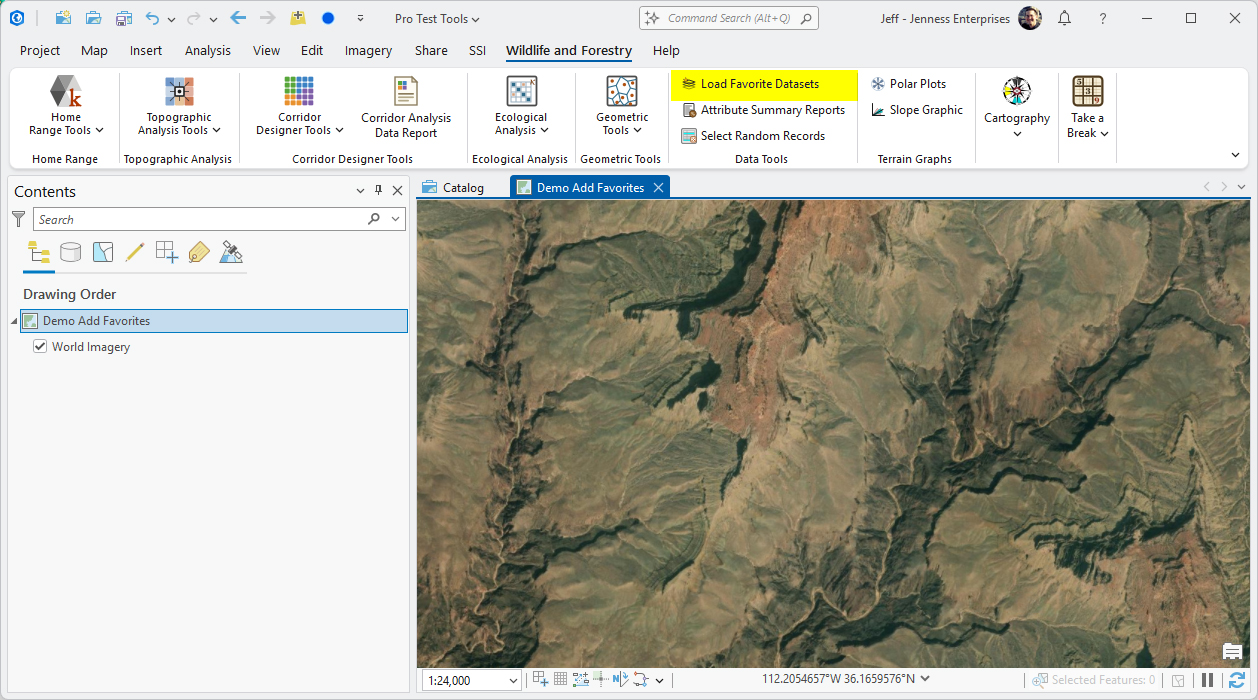
I start with just a basemap in the map:
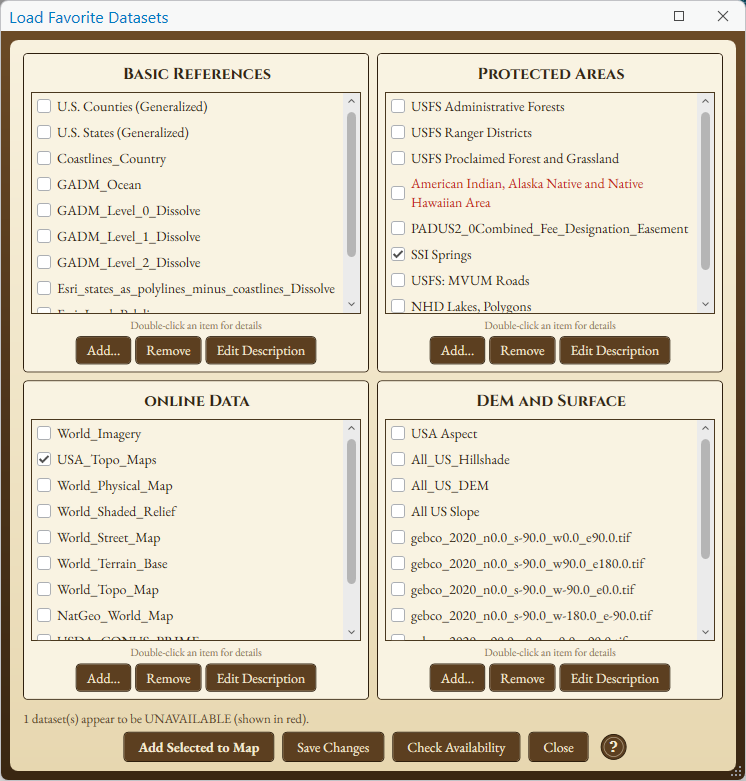
I open the window and pick the two datasets that I always use, my springs and the USGS topo maps. They are the two that are checked in the window at the top of this page. I click Add Selected to Map, and I arrive here:
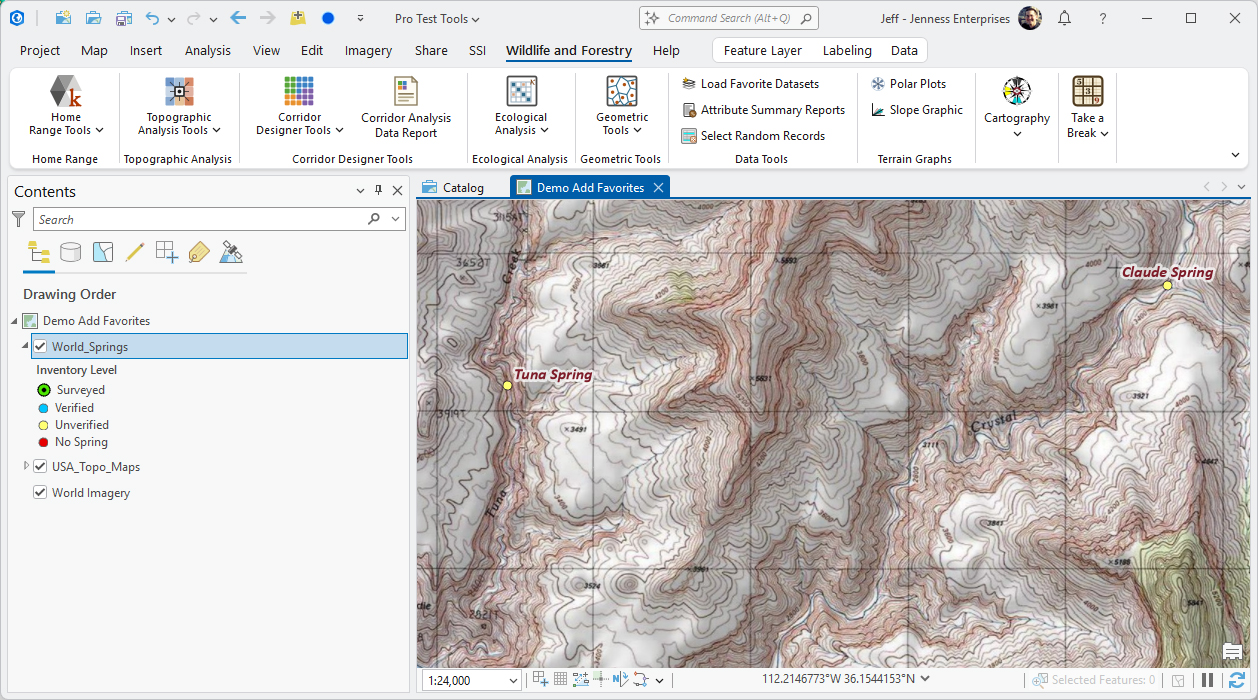
Lots of time saved. One of these favorites is a layer file on disk and the other is an online map service, and neither had to be hunted down.
A tour of the window
The window holds four groups, two across and two down. Each group is a list of datasets with a check box beside every one, a name across the top, and three buttons of its own underneath. The buttons along the bottom of the window act on all four groups together, and the line above them reports what the window has just done.
The window does not block ArcGIS Pro. It stays open beside the map while you work, and clicking the ribbon button again brings it back to the front. Drag its edges, or the grip in its lower right corner, to resize it.
The check boxes are how you tell the window which datasets you mean. Add Selected to Map loads every checked dataset in all four groups. A group's Remove and Edit Description buttons act on the checked datasets in that group only.
In each group
| Control | Explanation |
|---|---|
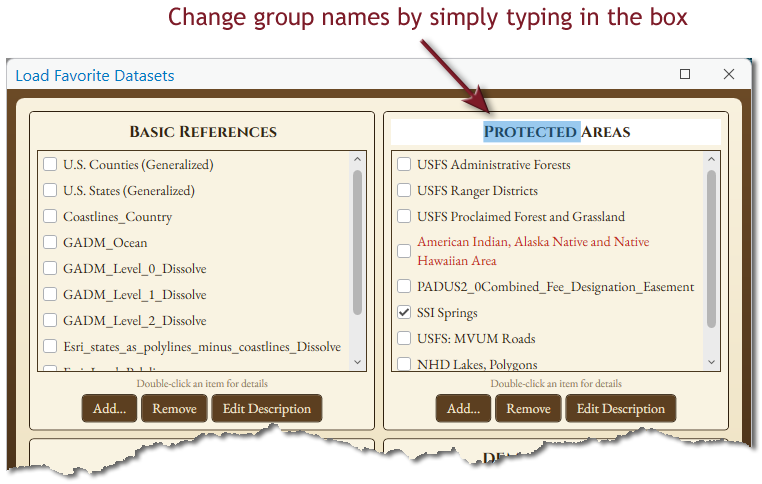
| The group's name | Click the name at the top of a group and type to
change it. The groups start out as Group 1 to
Group 4. They are only labels, so sort your
favorites any way you like: by project, by theme
(Basemaps, Boundaries, Elevation),
or by the server they come from.
|
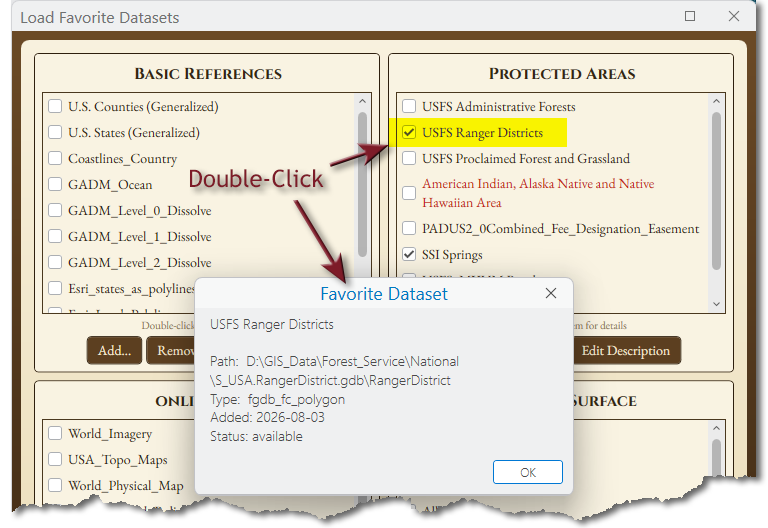
| The list | One line per dataset, showing the description you
gave it. Hover over a line to see where the dataset is,
what type it is, and the date it was added.
Double-click a line for the same details in a box of
their own, together with whether the dataset is
currently available.
|
| Add… | Browses for datasets to add to this group. See Adding datasets to a group. |
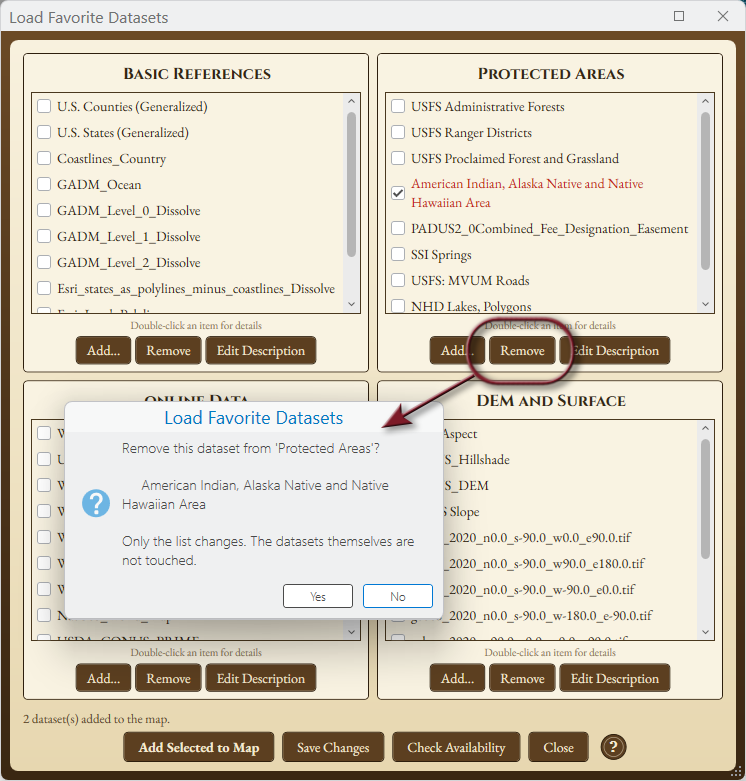
| Remove | Removes the checked datasets from this group's list,
after showing you which ones and asking you to confirm.
The datasets themselves are not touched.
|
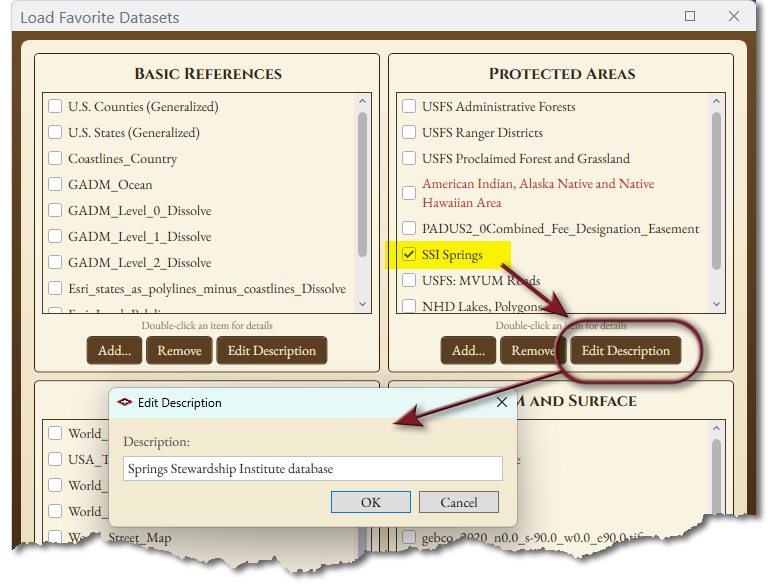
| Edit Description | Asks for a new description for each checked dataset
in this group, one after another. A description left
unchanged or blank, or a click on Cancel, leaves
that one as it was.
|
Along the bottom
| Control | Explanation |
|---|---|
| Add Selected to Map | Adds every checked dataset, from all four groups, to the active map. See Adding datasets to the map. |
| Save Changes | Saves the lists: the group names, the datasets and their descriptions. |
| Check Availability | Tests every dataset again and shows in red any that cannot be found. See Red means unavailable. |
| Close | Closes the window. If the lists have changed since they were last saved, it asks whether to save them first. |
Adding datasets to a group
Click Add… under the group you want. ArcGIS Pro's own browse dialog opens, the same kind that Add Data uses, and anything it can reach can be chosen: data on disk, datasets inside geodatabases, and the services under your portal and server connections. Several can be selected at once.
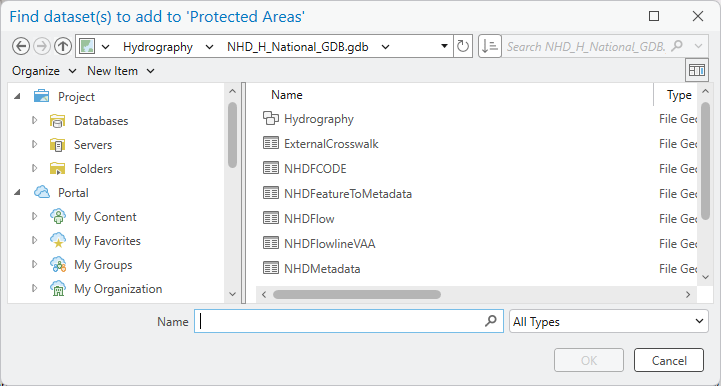
For each dataset you chose, a small box then asks for a description. It is the same kind of box that Edit Description shows. The description is what the list shows, so give it a name that works for you: Arizona land ownership, 2025 will still mean something next year, where own_poly_v3 may not. The box starts with the dataset's own name. Click OK to keep what is there or type something better. Cancel skips that dataset and goes on to the next.
New datasets go at the bottom of the group's list, and a list stays in the order its datasets were added.
Adding datasets to the map
Check the datasets you want, in any of the four groups, and click Add Selected to Map. They are added to the active map, so a map has to be the active view. If it is not, the window asks you to open a map view first.
Each new layer is placed in the Contents pane according to its type: point layers above line layers, lines above polygons, and rasters at the bottom. Layers of the same type keep the order they have in the lists. Tables are added as standalone tables.
A favorite can also be a layer file (.lyrx). It
is added as the layer saved in the file, with the symbology and
labels that were saved with it, so a favorite can be a finished
layer and not only a dataset. The springs in the
example at the top of this page are
one.
If a dataset cannot be loaded, the others still load, and a message then lists each one that failed along with the reason ArcGIS Pro gave. The check marks of the datasets that loaded are then cleared, so the window is ready for the next set. A dataset that failed stays checked.
Red means unavailable
Datasets get moved, drives get unplugged and servers go down. Every time the window opens, and again whenever datasets are added, it tests each favorite and shows in red any that it cannot find. The line at the bottom of the window reports how many there are, and Check Availability repeats the test whenever you like.
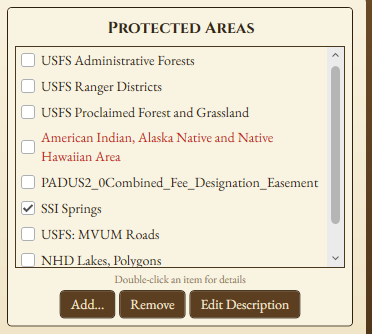
What the test looks at depends on where the dataset is:
| Where the dataset is | What is tested |
|---|---|
| A file or folder on disk, such as a shapefile, a raster file or a layer file | That the file or folder exists. For a layer file, that is the layer file itself and not the data it points to. |
| Inside a file geodatabase | That the geodatabase exists, and then that the dataset is in it: the geodatabase is opened and the feature class, table or raster is looked for by name. So a feature class that has been renamed or deleted turns red even though its geodatabase is still there. Other kinds of geodatabase dataset, such as mosaic datasets and topologies, are tested only by whether the geodatabase exists. |
| In an enterprise geodatabase, through an .sde connection file | That the connection file exists. The database itself is not contacted. |
| In a SQLite database or GeoPackage, or a KML file | That the file exists. |
| At a web address (http or https) | The server is contacted. Any answer at all counts as available, even a refusal for lack of a sign-in. No answer within five seconds counts as unavailable. |
| A service reached through a server connection in the Catalog pane (ArcGIS Server, WMS, WMTS, WCS, STAC or OGC API) | That the connection file exists, and then the server named in the connection file's name is contacted. If it answers, the dataset is available. If the server cannot be identified or does not answer, the dataset is left in black. |
Red is a warning and nothing more. A red dataset can still be checked and loaded, which is worth trying when a slow server has simply taken more than five seconds to answer. A dataset the window cannot test one way or the other is left in black.
Black, for its part, means only that the test found no problem. A dataset in an enterprise geodatabase, for example, is never contacted, so it stays black whether or not it is still there, and any trouble appears when you try to add it to the map.
Looking inside a geodatabase takes a little longer than the other tests, because it waits its turn with whatever ArcGIS Pro is doing. A dataset in a geodatabase may therefore turn red a moment after the window opens.
The details box says the same thing in words. Double-click a dataset and the last line reads Status: available, as in the figure above, or Status: UNAVAILABLE (path, dataset or server not found).
Saving the lists
Changes to the lists (a renamed group, a dataset added or removed, an edited description) are kept only when you click Save Changes. If you close the window with changes unsaved, it asks what to do: Yes saves them, No closes the window and discards them, and Cancel returns to the window.
That is also the way back from a mistake. If you remove datasets you meant to keep, or overwrite a description you wanted, close the window and answer No. The lists come back as they were last saved, although any other unsaved changes are lost with them.
The lists are stored in your Windows user profile and not in the project, which is why the same favorites appear in every project you open. Each Windows user of a computer has a separate set. The check marks are not stored, and the window always opens with nothing checked.
The file is favorite_datasets.json, in the
folder
%LOCALAPPDATA%\JennessEnterprises\WildlifeTools.
To carry your favorites to another computer, copy that file
into the same folder there. A favorite will load on the other
computer only if its path is valid there too.
Recommended citation
Credits and references
By Jeff Jenness, Jenness Enterprises (www.jennessent.com). A modernized recreation of the Load Favorite Datasets tool from the Springs Stewardship Institute (SSI) toolbar for ArcMap.
Licensing information
Works at every ArcGIS Pro license level (Basic, Standard, Advanced). No extension licenses are required.
Related tools and pages
- Attribute Summary Reports — counts and proportions of the values in an attribute field, formatted for a report.
- Select Random Records — select a random or systematic sample of features or table rows.