

How to Find the Jenness Enterprises Toolbox for Python Code
Every geoprocessing tool in the Wildlife and Forestry Tools add-in can be run from Python: in the Python window, in a notebook, or in a stand-alone script. Every tool page on this site ends with a Python sample, and every sample starts with the same two lines:
import arcpy
arcpy.ImportToolbox(r"C:\path\to\JennessEnterprisesTools.pyt")  # your install path
The path in the second line is a placeholder. The sample will not run until it is replaced with the real location of the toolbox on your computer. This page shows four ways to find that location, and how to put it into the sample.
arcpy.ImportToolbox(...) line for your
computer. Copy that line over the placeholder line in the
sample.
This only matters if you want to run the tools from Python code. The ribbon buttons and the toolbox itself are installed automatically when you install the add-in, and every Jenness Enterprises geoprocessing tool can be found in the Geoprocessing pane, in the Jenness Enterprises Tools toolbox or by searching for its name. Nothing on this page is needed to use the tools that way. If you want to run a tool in the Python window or in a script, though, the code has to start with a line that tells Python where to find the tools.
Why the import line is needed
ArcGIS Pro loads Esri's own system toolboxes into
arcpy automatically. It does not do that for any
other toolbox, including one delivered inside an add-in. Until
the toolbox has been imported, arcpy does not know
the tools exist, and a call such as
arcpy.jenness.LoCoHStandard(...) fails with:
AttributeError: module 'arcpy' has no attribute 'jenness'arcpy.ImportToolbox fixes that. It needs to be
told where the toolbox file is, and that is the only part that
differs from one computer to the next.
Where the toolbox lives
All of the geoprocessing tools are in one Python toolbox
file, JennessEnterprisesTools.pyt. It is packed
inside the add-in. When ArcGIS Pro loads the add-in, it
unpacks the add-in's files into a folder in your Windows user
profile, and the toolbox lands here:
C:\Users\your user name\AppData\Local\ESRI\ArcGISPro\AssemblyCache\{9b04581c-dbfe-4025-8713-1cd30b3b1e47}\Toolboxes\JennessEnterprisesTools.pytThe long folder name in braces is the add-in's ID. It is the same on every computer and in every version of the add-in. The only part of the path that changes is your Windows user name.
You do not normally see this folder. AppData is
a hidden folder, so File Explorer does not show it unless hidden
items are turned on. You can still get there by pasting the
path into File Explorer's address bar.
Method 1: read it from a tool's run messages
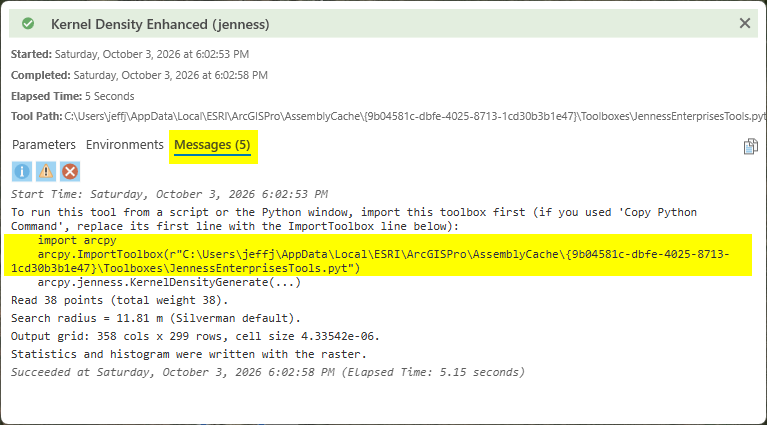
This is the easiest way, and it cannot give the wrong answer. Every geoprocessing tool in the add-in begins its run by writing the import lines for your computer into its messages. Run any tool, for example Kernel Density Enhanced, then open its messages (View Details at the bottom of the Geoprocessing pane). Near the top you will find:
To run this tool from a script or the Python window, import this toolbox first (if you used 'Copy Python Command', replace its first line with the ImportToolbox line below):
    import arcpy
    arcpy.ImportToolbox(r"C:\Users\your user name\AppData\Local\ESRI\ArcGISPro\AssemblyCache\{9b04581c-dbfe-4025-8713-1cd30b3b1e47}\Toolboxes\JennessEnterprisesTools.pyt")
    arcpy.jenness.KernelDensityGenerate(...)
The second and third lines are exactly what the sample needs. The last line also shows the tool's Python name, which is not always the same as the name on the ribbon.
Method 2: read it from the geoprocessing history
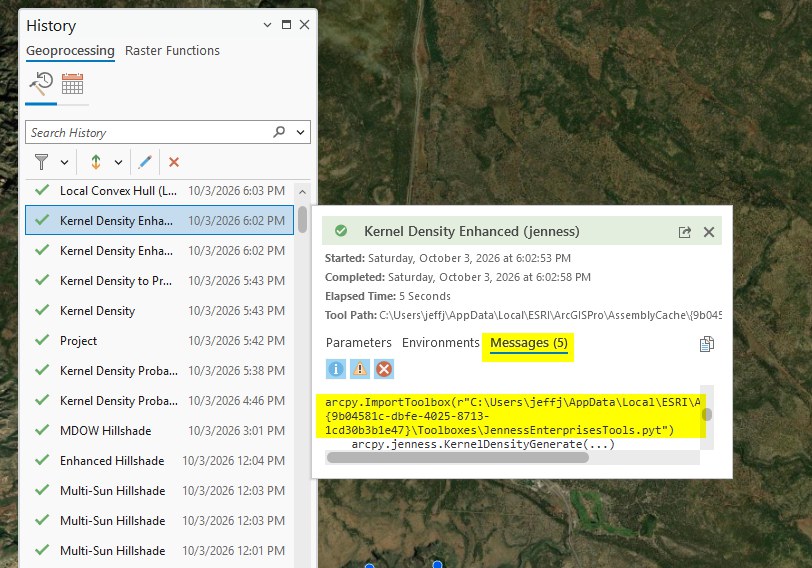
If you have already run a tool, there is no need to run it again. Open the History pane (Analysis tab, History), find any run of a tool from this add-in, and view its details. The first entry is the Tool Path:
C:\Users\your user name\AppData\Local\ESRI\ArcGISPro\AssemblyCache\{9b04581c-dbfe-4025-8713-1cd30b3b1e47}\Toolboxes\JennessEnterprisesTools.pyt\KernelDensityGenerateThat is the toolbox path with the tool's name added on the
end. Drop the last piece (here,
\KernelDensityGenerate) and what remains, ending
in .pyt, is the path to use. The same details
window also holds the run messages, so Method 1 works from
here too.
Method 3: copy the whole command from the history
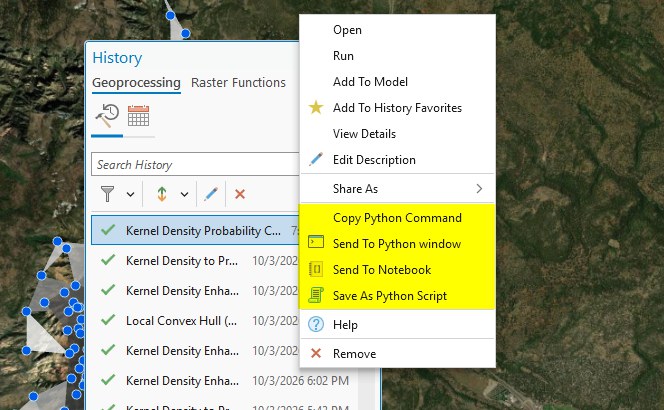
The History pane can also hand you the finished code. Right-click any past run of a tool from this add-in and the menu offers four choices:
- Copy Python Command puts the code on the clipboard.
- Send To Python window places it in the Python window, ready to run.
- Send To Notebook places it in a notebook cell.
- Save As Python Script writes it to a
.pyfile.
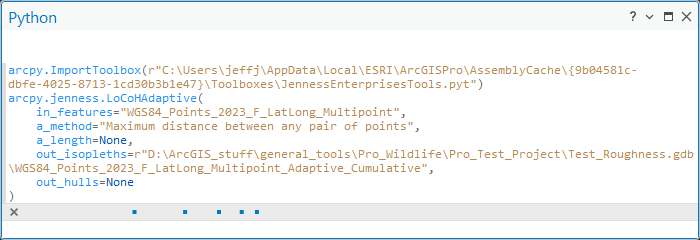
All four give the complete command for that run: the
arcpy.ImportToolbox line with the correct path to
the Jenness Enterprises toolbox on your computer, followed by
the tool call with every parameter set to the value used in
that run. This is the fastest way to turn something you have
just done in a dialog into code, and the import line it
produces can be copied into any other sample.
In a stand-alone script, make sure import arcpy
comes before these lines.
The one to avoid: Copy Python Command in the tool dialog
There is a second Copy Python Command, and it does not give the correct path. It is in the tool dialog itself, in the menu beside the Run button, and it is the one people reach for first because it works before the tool has been run.
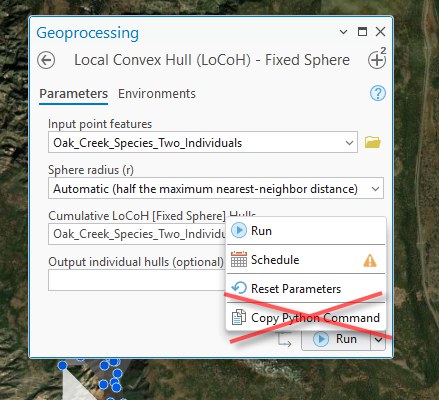
The command it copies has the tool call and the parameter values right, but its first line imports the current project's own toolbox, not the Jenness Enterprises toolbox:
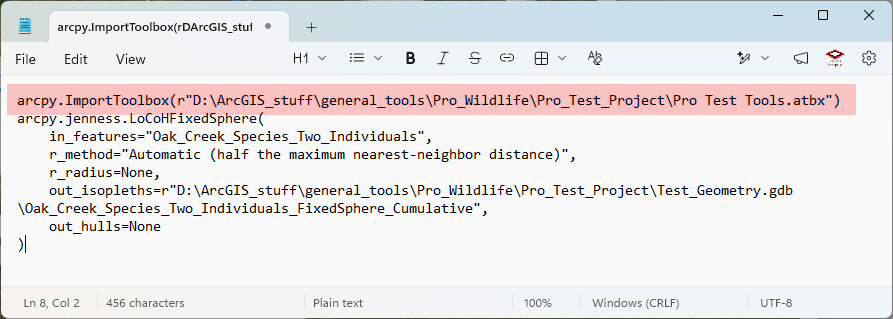
.atbx toolbox, which does not hold these tools,
so the code fails.If you have already copied a command this way, it is easy
to repair: replace its first line with the
ImportToolbox line from any of the methods on this
page. Everything below the first line is correct. Or run the
tool, then copy the command from the History pane as in
Method 3, where the path comes out right.
We have submitted a request to Esri to correct this behavior, so that the command copied from the dialog names the toolbox the tool actually came from.
Method 4: let Python build the path
Because only the user name changes, Python can assemble the
path by itself. Windows keeps the location of your
AppData\Local folder in an environment variable
named LOCALAPPDATA, so these lines produce the
right path for whoever runs them:
import os
import arcpy

pyt = os.path.join(os.environ["LOCALAPPDATA"], "ESRI", "ArcGISPro",
                   "AssemblyCache",
                   "{9b04581c-dbfe-4025-8713-1cd30b3b1e47}",
                   "Toolboxes", "JennessEnterprisesTools.pyt")
arcpy.ImportToolbox(pyt)
This is the form to use in a script that will be shared with other people or run on more than one computer, because nothing in it has to be edited. Each of those computers needs the add-in installed, and ArcGIS Pro must have been started at least once since it was installed so the toolbox has been unpacked.
Putting the path into a sample
Here is the Python sample from a tool page as it appears on this site:
import arcpy
arcpy.ImportToolbox(r"C:\path\to\JennessEnterprisesTools.pyt")  # your install path
arcpy.jenness.LoCoHStandard(
    in_features=r"D:\data\telemetry.gdb\owl_fixes",
    k=10,
    out_isopleths=r"D:\data\telemetry.gdb\owl_isopleths_k10")
And here it is ready to run, for a Windows user named
maria. Only the second line has changed:
import arcpy
arcpy.ImportToolbox(r"C:\Users\maria\AppData\Local\ESRI\ArcGISPro\AssemblyCache\{9b04581c-dbfe-4025-8713-1cd30b3b1e47}\Toolboxes\JennessEnterprisesTools.pyt")
arcpy.jenness.LoCoHStandard(
    in_features=r"D:\data\telemetry.gdb\owl_fixes",
    k=10,
    out_isopleths=r"D:\data\telemetry.gdb\owl_isopleths_k10")
A few things to notice:
- Keep the
rin front of the opening quote. It tells Python to read the backslashes in the path as plain backslashes. Without it, Python tries to read\UinC:\Usersas a special character and stops with aSyntaxError: (unicode error)message. - Keep the braces. The
{9b04...}folder name includes them. - The path ends at
.pyt. The tool's name goes in the next line, afterarcpy.jenness. jennessis the toolbox's alias. Every tool in the add-in is called asarcpy.jenness.ToolName(...).- Import once. One
ImportToolboxline at the top of a script, or once in a Python window session, serves every tool call that follows. - Change the data paths too. The dataset paths in
each sample (
D:\data\...) are also examples, to be replaced with your own.
When it does not work
| Message | Cause and cure |
|---|---|
| AttributeError: module 'arcpy' has no attribute 'jenness' | The toolbox has not been imported in this session.
Add the ImportToolbox line above the tool
call. |
| OSError: The toolbox file … was not found | The path is not right for this computer. The placeholder path was left in, the user name is wrong, or the add-in has not been installed and loaded by ArcGIS Pro on this computer. Copy the path again using Method 1. |
| SyntaxError: (unicode error) 'unicodeescape' codec can't decode bytes … | The r in front of the path's opening
quote is missing. |
A stand-alone script must also be run with the Python that
comes with ArcGIS Pro, since that is the Python that has
arcpy.
Related pages
- Tool Reference — every tool in the add-in; each geoprocessing tool's page ends with its Python sample
- Kernel Density Enhanced — the tool used in the examples on this page