NAME: Weighted Mean of
Points (v. 1.2c) (Click Name
to Download)
Aka: weightmean.avx
Last modified: March
11, 2004
TOPICS: ArcView 3.x, Weight, Mean, Point, View, Analysis, Tools
AUTHOR:
Jeff Jenness
Wildlife Biologist, GIS Analyst
Jenness Enterprises (928)
607-4638
3020 N. Schevene Blvd.
Flagstaff, AZ 86001
jeffj@jennessent.com
DESCRIPTION: This extension creates a new button on the VIEW
toolbar which enables you to calculate the weighted mean of a group
of points. You have the option to create a RESULTS table containing
this information, a new shapefile of the weighted mean center point,
and/or a graphic symbol representing the weighted mean.
Weighted Mean uses the following equations to calculate the
weighted mean center of a cluster of points.
All or only selected records:
You can either use all the
points in the point theme for the analysis or only a selected subset of points.
If
any points in your theme are selected, then only those selected points
in that theme will be used in the analysis. If no points in your theme
are selected, then all points in that theme will be used in the
analysis.
Projected vs. Unprojected Views: If
your original data are
in Lat/Long coordinates (the Geographic Projection) and your View
has been projected, then you have the option of calculating RESULTS
data based on either the Geographic Projection or your View
Projection. The choice of projections can dramatically affect the
location of the mean of the point coordinates used in the analysis.
Weighted and Unweighted Data: This tool can
also be used to calculate the standard, unweighted average point
location.
Results: Upon completion,
you will have one or all of the
following depending on your choice:
A Results
table,
A Shapefile, containing a single point representing the
weighted mean center of the point theme, and/or
A Graphic Symbol displayed on the view representing the
weighted mean center of the point theme.
Both the Results table and the Shapefile will have a
single record with the following fields:
- Weight_fld:
Field name of the Weighting field from the Point
Theme.
- Num_recs:
The total number of points used in the analysis.
Remember that if any of the points were selected prior to the
analysis, then only those points will be used in the analysis.
- X_Coord:
The X-coordinate of the weighted mean center.
- Y_Coord:
The Y-coordinate of the weighted mean center.
REQUIRES: This extension requires a Point theme with a numeric
Weighting field.
This extension also requires that the file "avdlog.dll" be
present in the ArcView/BIN32 directory (or $AVBIN/avdlog.dll) and that
the Dialog Designer extension be located in your ArcView/ext32
directory, which they usually are if you're running AV 3.1 or better.
The Dialog Designer doesn't have to be loaded; it just has to be
available.
REVISIONS: The 1.2b revision (Nov. 21, 2003)
modifies the update script to avoid an “AVArray” error and modifies the
calculation script to ignore null points. The 1.2c revision (March
11, 2004) modifies the calculation script to ignore null weight values,
and produces a report notifying you if any null points or weight values
were encountered.
Recommended Citation Format: For those who wish to cite
this extension, the author recommends something similar to:
Jenness, J. 2004. Weighted Mean of Points (weightmean.avx)
Extension for ArcView 3.x, v. 1.2c. Jenness Enterprises.
Available at: http://www.jennessent.com/arcview/weighted_mean.htm.
Please let me know if you cite this extension in a publication (jeffj@jennessent.com).
I will update the citation list to include any publications that I am
told about.

General Instructions:
1)
Begin by placing the "weightmean.avx" file into the
ArcView extensions directory (../../Av_gis30/Arcview/ext32/).
2) After starting ArcView, load the extension by clicking on File
--> Extensions…
, scrolling down through the list of available extensions,
and then clicking on the checkbox next to the extension called
"Weighted Mean of Points."
3) Decide which point theme contains the points you’re
interested in, and if you want to run this extension on all those
polygons or just a subset of them.
If you want to find the weighted mean center of a subset of the
points, then start by selecting
those points you’re interested in.
If any points are selected, then this extension will operate on
only those selected points.4) From
your View toolbar, click on the
icon.
This brings up the Select Point Theme dialog box:
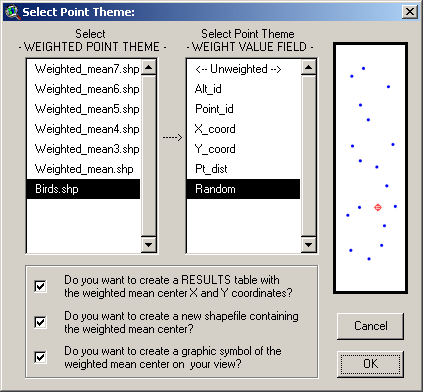
The Weighted Point Theme list
contains all the point themes from your view. When you select the
one you want, then the Weight Value Field list will fill up with
all the numeric fields from that point theme. Select the field
that contains the numeric weights of each point.
Next, select the output you want. Your
weighted mean center can be represented with a RESULTS table, a new
Shapefile and/or a graphic symbol. Both the RESULTS table and the
Shapefile Point Attribute Table will contain a single record containing
the name of the Weighting Field, the number of records used in the
analysis, and the X and Y coordinates of the weighted mean center.
5) Select Projection of RESULTS data: This option only applies if
your original data are in
Latitude/Longitude coordinates (i.e. the "Geographic" or
"Unprojected" projection) and your View is set to some
user-specified projection. In this case you have the option of
calculating the nearest features based on either your View
projection or on the original Geographic projection.
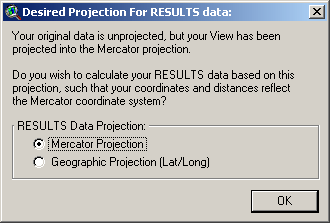
This choice can have a dramatic effect on
the calculated weighted mean center of your points. Coordinates measured in "degrees" become especially
problematic the farther you get from the equator, since longitudinal
degrees are not the same as latitudinal degrees. A degree in
longitude is always longer than a degree in latitude, so the east/west
distances between your points are artificially weighted more than the
north/south distances. The author recommends
that you calculate your RESULTS data based on your View Projection
rather than the Geographic projection, unless you have some specific
reason to need the results to be based on latitude and longitude
coordinates.
6) Specify Hard Drive Locations to save the RESULTS table
and/or the new Shapefile: If you choose to calculate either a
RESULTS table or a new Shapefile, you will be prompted to specify a
location on the hard drive to save the information. These are standard ArcView
Dialog Boxes and should be familiar to most users. These files are
permanent and will not be deleted when ArcView is shut down.
Enjoy! Please contact the author if you have problems or find bugs.
Jeff Jenness
jeffj@jennessent.com
3020 N. Schevene Blvd.
Flagstaff, AZ 86004
USA
Please visit Jenness Enterprises ArcView
Extensions site for more ArcView Extensions and other software by
the author. We also offer customized ArcView-based GIS consultation
services to help you meet your specific data analysis and application
development needs.