
![]()
![]()
![]()
![]()
![]()
![]()
The
![]() button lets you
generate one of four basic dialog types. Click this button and you’ll be
prompted to specify which dialog type to create.
button lets you
generate one of four basic dialog types. Click this button and you’ll be
prompted to specify which dialog type to create.
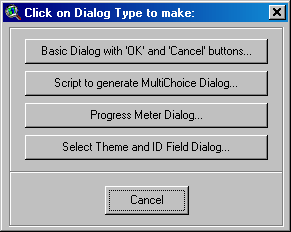
| Basic Dialog with 'OK' and Cancel Buttons | Progress Meter Dialog |
| Script to generate MultiChoice Dialog | Select Theme and ID Field Dialog |
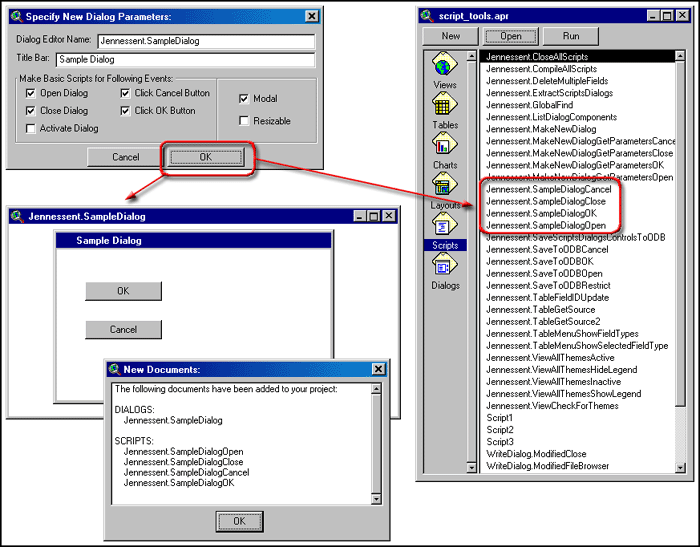
Basic Dialog with ‘OK’ and ‘Cancel’ buttons…: The first option simply makes a new basic dialog containing an “OK” and a “CANCEL” button with attached scripts that close the dialog. It also makes Dialog Open, Close and Activate scripts and attaches them to the dialog. When you click on the button, you’ll be queried for the name of the dialog and the title to appear on the dialog. Your new dialog will be automatically created, compiled and added to your project. You have the option to create generic scripts for the Dialog Open, Activate and Close events and the OK/Cancel button Click events. The generic Open script centers the dialog and identifies the OK and Cancel buttons. The generic Close script sets all object tags to nil. You also have the option to make the dialog modal and/or resizable. The generic Cancel button sets the modal result to nil if the dialog is modal.
See “Basic Dialog Scripts” in "Scripts Developed" for examples of these scripts.
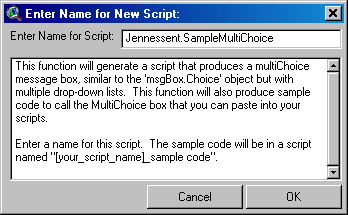
Script to generate MultiChoice Dialog: This option doesn’t actually produce a Dialog Editor in your project, but rather a script that you can call to generate a MultiChoice dialog on the fly. This multichoice dialog is kind of a cross between the “MultiInput” message box and the “Choice” message box. It has multiple drop-down boxes generated from a set of lists that you send to it. This option also generates a script of sample code to show you how to use the function. Click this button and you’ll be prompted for the name you would like to call the script:
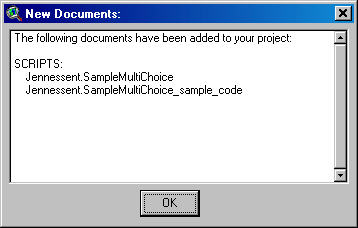
When you click the “OK” button you’ll see a list of the scripts that were added to your project:
Review the “Sample Code” script for some examples on how to use this script. Essentially you send 4 objects to the script consisting of a message, a title, a list of labels and a list of lists for the drop-down combination boxes. The script then generates a MultiChoice dialog on-the-fly based on how many lists you send it. The lists of objects for the drop-down listboxes can contain any type of objects. They are not limited to string or number objects.
For example, if you had a list of 6 states and wanted to let the user select from a drop-down list for each of these states, you could use the following line of code to return the 6 selected values:
theChoices = MsgMultiChoice.DoIt({theMessage, theTitle, theListOfLabels, theListOfLists})
The script would then generate a MultiChoice dialog with 6 drop-down boxes:
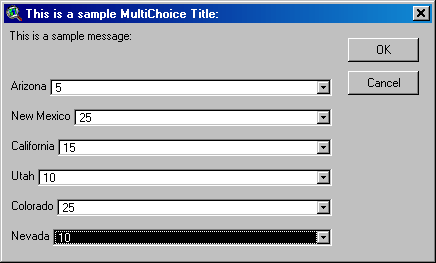
If you run the Sample Code script, it will show you a report of the 6 values you chose. This is not a function of the actual MultiChoice script, but rather just an illustration of it’s use. You can do anything you want with the selected list of items. This dialog is also resizable by dragging on a corner, so you can expand the dialog if the list items or labels are too long to fit on the screen.

See “MultiChoice Scripts” in "Scripts Developed" for examples of these scripts.
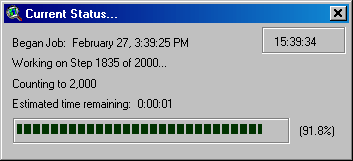
Progress Meter Dialog…: This Progress Meter is a modeless dialog you can incorporate into a script or extension to show what ArcView is currently working on, how long it's been working and how long it'll probably take to finish. It's especially well adapted for scripts that have lengthy "for each" loops that take hours, days or weeks to finish. This is basically the same dialog as you’ll find at http://www.jennessent.com/arcview/progress_meter.htm.
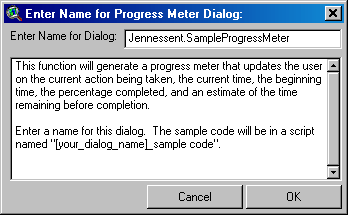
Click this button and you’ll be prompted for the name of the Progress Meter Dialog Editor document:
Click “OK” and the tool will produce a progress meter dialog and 3 scripts:
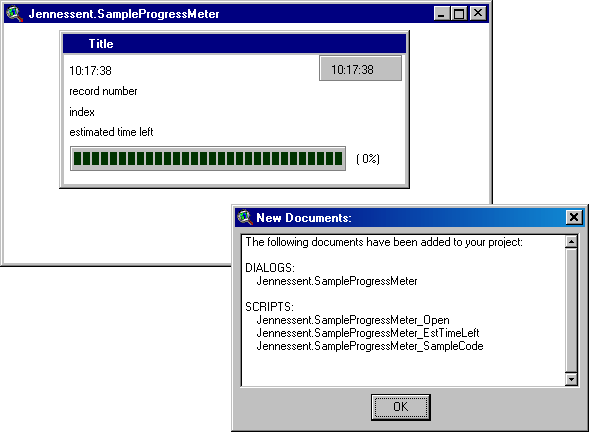
The “Open” script centers the dialog on the page and clears out any existing text from the labels. The “EstTimeLeft” script is the script you call to update the progress meter. You essentially send it data regarding what step you are on and how many steps the process is going to take, and the “EstTimeLeft” script estimates the time remaining and updates the progress meter.
The “Sample Code” script illustrates how to use the progress meter. You can run the sample code script to see the progress meter run through two functions; first by counting to 2,000 and updating itself at every increment, and then by counting to 40,000 and updating itself every second. See “Progress Meter Scripts” in "Scripts Developed" for examples of these scripts.
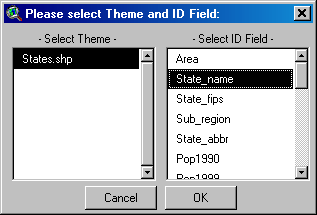
Select Theme and ID Field Dialog…: This is a simple dialog that opens with two listboxes, a Cancel button and an OK button. The dialog is intended to query the user for a particular theme and a particular field from the theme attribute table (often an ID field). The first listbox is preset to list the themes in a view and the second listbox is set up to list the fields of the selected theme. Optionally you can preset the first listbox to list all the tables in the current project.
Click this button and you’ll be prompted for several parameters:
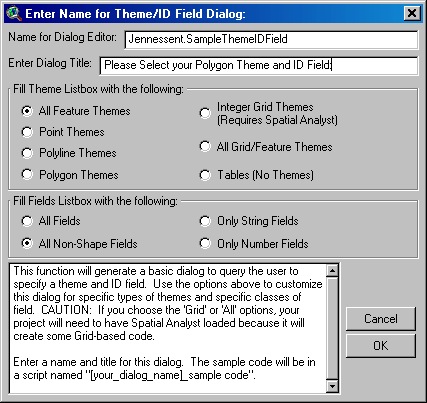
The “Name for Dialog Editor” will be the name of the Dialog Editor document. The “Title” is the text that will appear in the blue bar at the top of the dialog. For some reason this title does not always show up in the Dialog Editor window, but the title appears correctly when the dialog itself is opened.
You can preset the dialog to show only a subset of the themes in the Themes listbox, and you can also restrict the fields to specific field types. If you want to change any of these after you have created the Dialog Editor, you can easily make the modifications in the scripts. These presets just save time up front if you know exactly what type of themes and fields you want to query for.
Click “OK” and the tool will generate the dialog and 7 scripts:
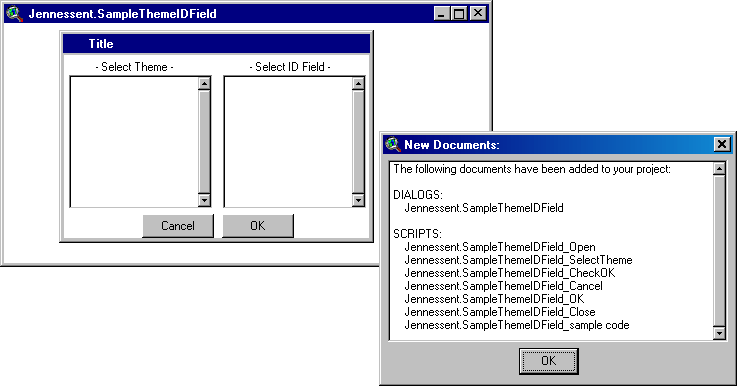
All the scripts except the “Sample Code” script pertain to the dialog itself and control what happens when you select a theme or field, or click on the OK or Cancel buttons. The “Sample Code” script illustrates how to use the dialog. For examples of these scripts, see “Theme and ID Field Scripts” in "Scripts Developed" for examples of these scripts.
Back to Script/Dialog Tools Page | Scripts Developed
![]()
Please visit Jenness Enterprises ArcView Extensions site for more ArcView Extensions and other software by the author. We also offer customized ArcView-based GIS consultation services to help you meet your specific data analysis and application development needs.
![]()