![]()
![]()
![]()
![]()
![]()
![]()
![]()


NAME:
Distances and Bearings between
Matched Features v. 2.1
(Click Name to Download)
Aka: DistByID.avx
Last modified: September 4, 2007
TOPICS: ArcView 3.x, Distance, Bearing, View, Analysis, Tools, Centroid, Closest Edge, Selected Features, Matched Features, Paired Features, Common Attribute Values
AUTHOR: Jeff Jenness
Jeff Jenness, GIS Analyst
Jenness Enterprises
3020 N. Schevene Blvd.
Flagstaff, AZ 86004
jeffj@jennessent.com
(928) 607-4638
DESCRIPTION: This extension calculates the distance and bearing between features with identical attribute values, allowing you to generate connecting lines and calculate data for specific sets of features.
Output options include a Results table containing various user-selected fields such as distance and bearing between features, X/Y coordinates, centroids vs. closest edges, etc. You can also generate a polyline shapefile of the lines connecting features or draw graphic connecting lines in the view.
Centroids vs. Closest Edges: If desired, this extension can calculate the distance and bearing between the centroids of the Input and Comparison features as well as the distance and bearing between the closest edges of those features. For example, if two polygon themes are used in the analysis, then this extension will determine what points on the edges of the respective polygons (not necessarily vertices) are closest to each other, and calculate the distance and bearing based on these closest points. If the features intersect or if one lies within the other, the distance between edges will be zero but there will still be a calculated value for the distance between centroids. You can have graphics drawn connecting the centroids and/or the closest edges of the respective features.
All or only selected records: You can either use all the features in your input and comparison themes, or only a selected subset of those features for the analysis. If any features in either theme are selected, then only those selected features in that theme will be used in the analysis. If no features are selected, then all features in that theme will be used in the analysis.
Projected vs. Unprojected Views: If your original data are in Lat/Long coordinates (the Geographic Projection) and your View has been projected, then you have the option to calculate data based on either the Geographic Projection (latitude/longitude) or the View Projection. The choice of projections can dramatically affect distances, bearings and coordinates of closest edge points.
Geodesic Curves: If your data are all in point format and if they are in geographic coordinates (i.e. Latitude/Longitude or “Unprojected”), then you have to option to calculate distances and bearings using geodesic curves in order to get the most accurate measures possible.
Add a Record Number Field to Tables: This extension requires that the input and comparison theme attribute tables have a field containing unique ID values that can be used to identify each feature. If such a field is not available, then this extension includes a function to generate a field of record numbers in your table (see Adding a Record Number Field below).
Output:
| Results Table: A table containing distances, bearings and locations of centroids and/or closest points between matching features. The fields are chosen by you, and the field will not be calculated if you do not want it. The optional fields are described on page 9 of this manual. Optionally, you can automatically join this Results table with the input DBF file. | |
| Polyline Shapefile: You may also elect to generate a polyline shapefile of connecting lines. The shapefile attribute table will have all the values described above, depending on the choices you specify. |
If either the input or comparison feature has a unique Selection value, then there will be no matching features and therefore Distance, Bearing and Edge Coordinates will be assigned the value -9999. No polylines will be generated in this case.
REQUIRES: This extension requires that the file "avdlog.dll" be present in the ArcView/BIN32 directory (or $AVBIN/avdlog.dll) and that the Dialog Designer extension be located in your ArcView/ext32 directory, which they usually are if you're running AV 3.1 or better. The Dialog Designer doesn't have to be loaded; it just has to be available. If you are running AV 3.0a, you can download the appropriate files for free from ESRI at:
http://support.esri.com/index.cfm?fa=downloads.patchesServicePacks.viewPatch&PID=25&MetaID=483
Recommended Citation Format: For those who wish to cite this extension, the author recommends something similar to:
Jenness, J. 2007. Distance and bearing between matched features (distbyid.avx) extension for ArcView 3.x, v. 2.1. Jenness Enterprises. Available at: http://www.jennessent.com/arcview/distance_by_id.htm.
Please let me know if you cite this extension in a publication (jeffj@jennessent.com). I will update the citation list to include any publications that I am told about.
UPDATES:
| Version 1.2 fixes an intermittent problem that produces the error message “Variable theCompPointOne has not been initialized,” and makes a few minor stylistic changes. | |
| Version 1.3 fixes an intermittent problem that generated -9999 values in cases where the ID values were large numbers. | |
| Version 1.4 fixes an intermittent problem that produced an error message stating that “Variable thePointX has not been initialized!”. | |
| Version 1.53 (February 27, 2004) includes options to calculate distances and bearings based on geodesic curves, if both input and comparison themes are Point themes. | |
| Version 2.0 (November 19, 2004) adds the option to generate data and connecting lines between multiple Input features and multiple Comparison features with the same attribute value, and also to generate connecting lines between features in the same theme. Version 2.0 also adds a button to delete any graphics created by this extension. | |
| Version 2.1 (September 4, 2007) corrects a bug with the message “Variable ComparisonIDIsString has not been initialized”, and which occurs when the user specifies that only a results table, but no polyline shapefile, should be generated. |
~~~~~~~~~~~~~~~~~~~~~~~~~~~~~~~~~~~~~~~~~~~~~~~~~~~~~~~~~~~~~~
General Instructions:
1) Begin by placing the "distbyid.avx" file into the ArcView extensions directory (../../Av_gis30/Arcview/ext32/).
2) After starting ArcView, load the extension by clicking on File à Extensions… , scrolling down through the list of available extensions, and then clicking on the checkbox next to the extension called "Distance/Bearing: Matched Features."
3) Click the
![]() button from the
View Button bar to start the analysis.
button from the
View Button bar to start the analysis.
General Concepts:
This extension works by generating a list of all unique attribute values used to match features (called “Selection” values), and then identifying all features from the 1st theme (called the “Input” theme) and all features from the 2nd theme (called the “Comparison” theme) with that attribute value. All input features will be connected to all comparison features with the same selection value, such that 5 input features and 6 comparison features with a common Selection value will produce 30 connecting polylines and 30 rows of data in the Results table.
This extension will not connect input features to themselves, or comparison features to themselves. In the example above, the 5 input features will ONLY be connected to the 6 comparison features and vice versa. However, you can use the same theme as both the Input theme and the Comparison theme, in which case all features with the same selection values will be connected to each other.
Using the Tool:
1) After clicking the button , you will see the following dialog prompting you to select the Input Theme, an Input ID Field, and an Input Selection field:
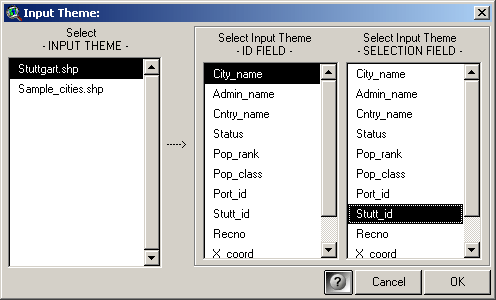
| ID Field: Select the field that contains a unique identifier for each feature in the Input Theme. These values are used to identify the respective input features in your output table and/or shapefile. If such a field is not available, you can generate a field of record numbers for this purpose (see Adding a Record Number Field below). | |
| SELECTION Field: Select the field that contains the attribute value that matches the Input features with the Comparison features. These are the values that will be used to identify which input and comparison features to connect. THIS CAN BE THE SAME FIELD AS YOUR ID FIELD. |
2) After clicking on the “OK” button, you will see the following dialog prompting you to select the Comparison Theme, a Comparison ID Field, and a Comparison Selection field:
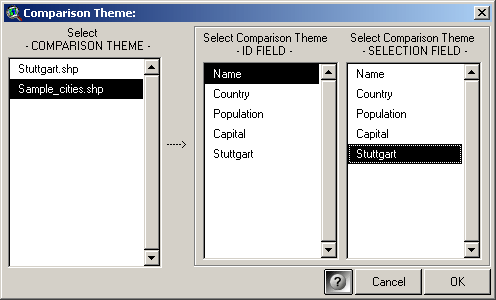
| ID Field: Select the field that contains a unique identifier for each feature in the Comparison Theme. These values are used to identify the respective comparison features in your output table and/or shapefile. If such a field is not available, you can generate a field of record numbers for this purpose (see Adding a Record Number Field below). | |
| SELECTION Field: Select the field that contains the attribute value that matches the Input features with the Comparison features. These are the values that will be used to identify which input and comparison features to connect. THIS CAN BE THE SAME FIELD AS YOUR ID FIELD. |
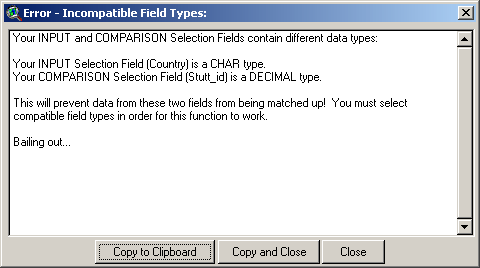
It is important to make sure that the Input and Comparison Selection Fields are the same field types. If they are not, then the data within those fields cannot be matched. For example, if the Input Selection Field “Stutt_ID” were a Numeric field while the Comparison Selection Field “Stuttgart” were a String field, then the values in these fields could never be matched because Strings are different things than Numbers. Even if the String field contained a series of numbers, those numbers would still be considered a String because of the Field Data Type. The extension will halt operation with the following error message if you use mismatched data types:
3) At this point, you may be asked what projection to use to calculate the RESULTS data. This option only applies if your original data are in Latitude/Longitude coordinates (i.e. the “Geographic” or “Unprojected” projection) and your view is set to some user-specified projection. In this case you have the option to calculate the distances and bearings between features based on either the View projection or on the original data Geographic projection.
This choice can have dramatic differences on distances, bearings and edge coordinates, and even on which parts of the features are considered “nearest” to each other. Remember that distance calculations are based on the coordinate system of the data and that therefore distances based on Latitude/Longitude coordinates will come out in units of “degrees,” which are rarely useful to the user. The results will not be truly in “degrees” either, because a degree is an angular measure and this extension will treat them as Cartesian values.
Distances measured in “degrees” become especially problematic the farther you get from the equator, since longitudinal degrees are not the same as latitudinal degrees. The author recommends that the user calculate the RESULTS data based on the View Projection rather than the Geographic projection, unless the user has some specific reason to need the results to be based on latitude and longitude coordinates.
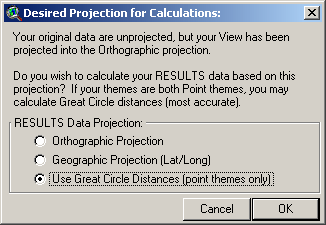
Geodesic Curve Option: If your input and comparison data are both points from a point theme, and if all themes in your view lie within geographic limits (i.e. all coordinates are between -180º and 180º Longitude, and -90º and 90º Latitude) then you will be offered the option to calculate your distances and bearings using great circle distances measured on geodesic curves. These curves will give you more accurate results if your points are separated by large distances. If your view is projected, then you can select the “Geodesic Curve” option in the projection dialog above. If your view is not projected, then you will be prompted in a separate window:
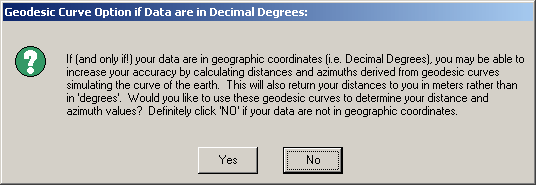
This extension is currently set up to only offer geodesic distances if working with points. This option will not be offered if you are working with polylines or polygons. Also, it assumes that the point coordinates are in Latitude/Longitude, so the results will not be accurate if your points are in any other coordinate system.
These geodesic distances are really the only way to get consistently accurate distance measures when your route goes over significant portions of the earth. This method is more accurate than using an equidistant map projection because such projections are only accurate between specific points. These geodesic curves allow us to determine distances between any two points on the globe.
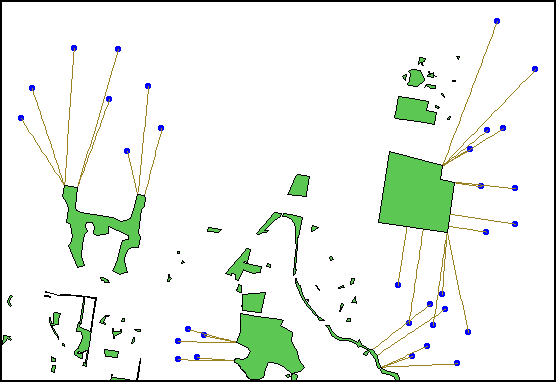
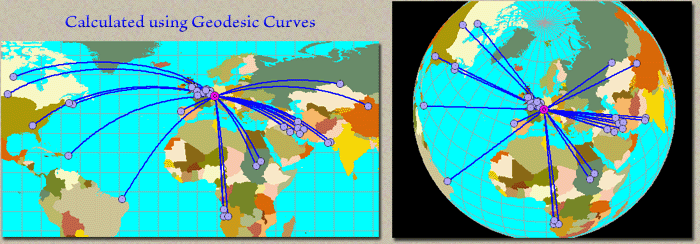
For example, the following image connects Stuttgart, Germany with several cities around the world. If you conduct the analysis using geographic coordinates, then you get straight-line distances on the geographically-projected map. However, when looking at the planet as a 3-dimensional object, it becomes apparent that these straight-line distances are not actually the shortest routes between cities:
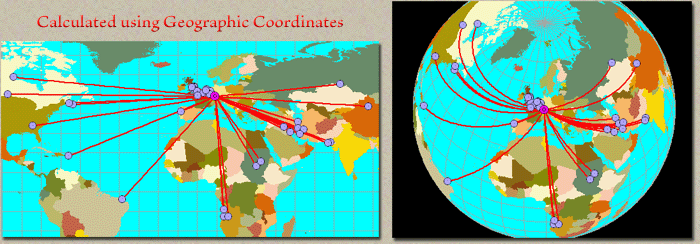
Geodesic curves provide much more accurate measures of distance over the surface of the planet. They look odd when projected into the geographic projection but they are clearly the more accurate method when viewed from space.
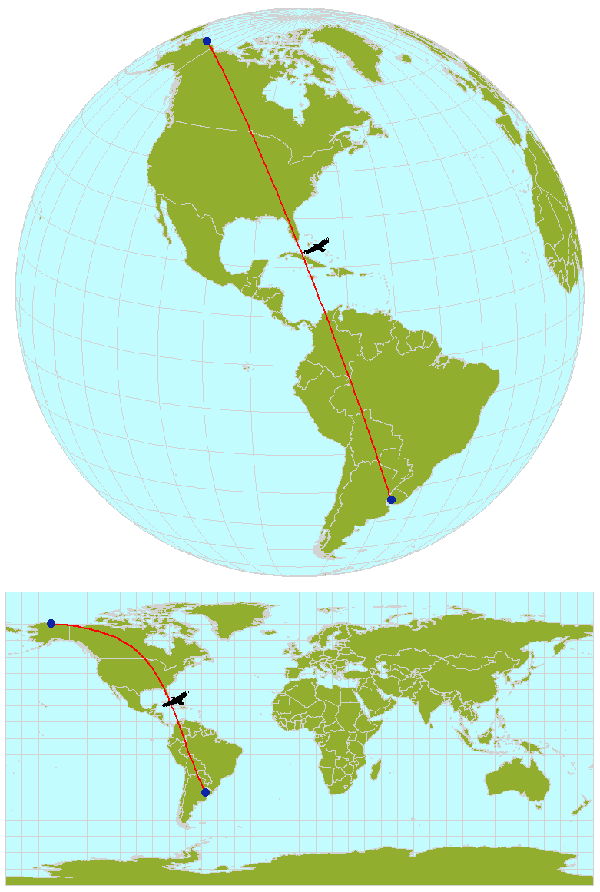
In another example, the following image illustrates a long-distance migration route for a hypothetical bird. It may fly in a straight line from Uruguay to Alaska, but only a equidistant projection specifically set for this route can produce accurate values for distance and azimuth. Geodesic curves do not rely on particular projections because they model the actual shape of the world in 3 dimensions. They do, however, depend on a spheroidal model, and this extension uses the WGS-80 spheroid for all geodesic calculations.
4) After the Themes and their associated ID and Selection fields are selected, you will be prompted to specify what data you want to calculate. Each checked option will become a new field in the Results table.

Each option will create the following fields in the Results table.
| Input Unique ID [Input_ID]: ID value for the INPUT feature, taken from the Input theme DBF file. Each Input feature is identified in the result table allowing it to be linked back to the original Input theme shapefile. In most cases, this field should contain unique values for each input feature. | |
| Comparison Unique ID [Comp_ID]: ID value for the COMPARISON feature, taken from the Comparison theme DBF file. Distances and bearings are calculated for the line connecting the INPUT feature to the COMPARISON feature. | |
| Input Selection Value [Input_Val]: Selection value for the INPUT feature, taken from the Input theme DBF file. This value is used to match the INPUT feature with a COMPARISON feature with the same value. | |
| Comparison Selection Value [Comp_Val]: Selection value for the COMPARISON point, taken from the Comparison theme DBF file. | |
| Input Centroid X-Coordinate [Fr_Cent_X]: The X-coordinate of the centroid of the INPUT feature. | |
| Input Centroid Y-Coordinate [Fr_Cent_Y]: The Y-coordinate of the centroid of the INPUT feature. | |
| Comparison Centroid X-Coordinate [To_Cent_X]: The X-coordinate of the centroid of the COMPARISON feature. | |
| Comparison Centroid Y-Coordinate [To_Cent_Y]: The Y-coordinate of the centroid of the COMPARISON feature. | |
| Input Closest Edge X-Coordinate [Fr_Edge_X]: The X-coordinate of the closest edge of the INPUT feature. | |
| Input Closest Edge Y-Coordinate [Fr_Edge_Y]: The Y-coordinate of the closest edge of the INPUT feature. | |
| Comparison Closest Edge X-Coordinate [To_Edge_X]: The X-coordinate of the closest edge of the COMPARISON feature. | |
| Comparison Closest Edge Y-Coordinate [To_Edge_Y]: The Y-coordinate of the closest edge of the COMPARISON feature. | |
| Bearing to Centroid [Cent_Bear]: The bearing of the line connecting the Centroids of the INPUT and COMPARISON features. | |
| Distance to Centroid [Cent_Dist]: The distance of the line in map units connecting the Centroids of the INPUT and COMPARISON features. | |
| Bearing to Closest Edge [Edge_Bear]: The bearing of the line connecting the Closest Edges of the INPUT and COMPARISON features. | |
| Distance to Closest Edge [Edge_Dist]: The distance of the line in map units connecting the Closest Edges of the INPUT and COMPARISON features. |
Joining Results Table to Input Table: This dialog box also gives you the option to join the Results table with the Input Theme Feature Table. If you choose this option, the table can still always be separated by clicking on “Remove All Joins” in the table menu. Regardless of whether you join tables or not, the table will still be saved onto the hard drive. IMPORTANT: This option is most useful when each input feature can only be matched to a single comparison feature. If you have multiple comparison features that are matched to any particular input feature, then only the first comparison feature will be joined to the Input table. This is the case any time two tables are joined together.
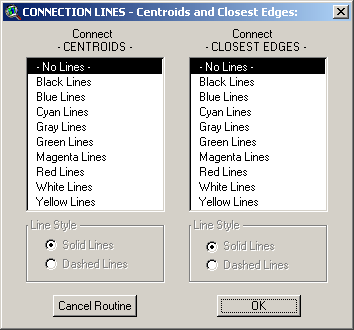
5) The next step is to choose any desired graphics connecting each Input Feature to it’s respective Comparison Feature. You have the option to creating lines connecting either centroids, closest edges, or both, and the lines can be either dashed or solid and can be selected from a variety of colors:
If you do not wish to generate graphic lines, leave the
options set to “– No Lines –“ and click the OK button. If you generate
graphics, then you can always delete them by clicking the
![]() button in the
View button bar.
button in the
View button bar.
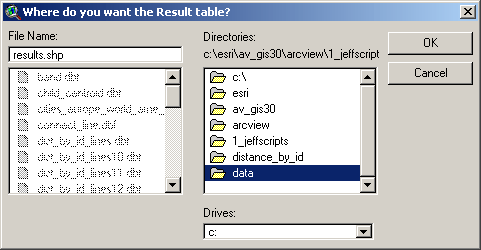
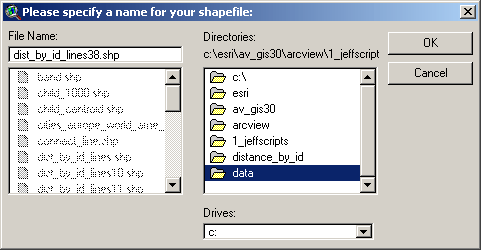
6) Finally, choose the name and location for the RESULTS and/or the new shapefile table on the hard drive. These are standard ArcView dialog boxes and should be familiar to most users. The table will appear in your current project regardless of where you save the table, either as a separate table or joined to the Input Theme Feature Attribute Table. The shapefile will be added as a theme to the current view.
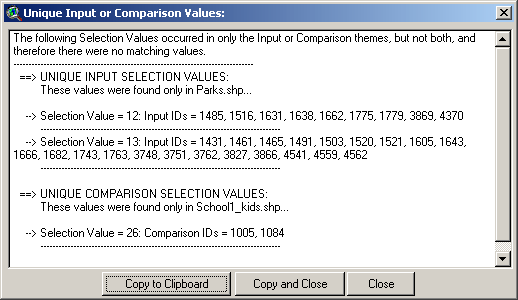
7) If any of your input or comparison features had no corresponding features to match with, you will be alerted to that fact in the following dialog:
This extension requires that you specify a field containing unique ID values for both the Input and Comparison themes. These values are necessary because otherwise there is no easy way to determine which Results record, or connecting line shape, is associated with each input or comparison feature.
If there is no ID field available, then the record numbers in the attribute table would serve the purpose perfectly. Therefore the author added this function to easily create a “Record Number” field in your table. IMPORTANT: This function will modify your existing table and the change will be permanent. There is no UNDO operation for this. The modification is minor, though, and none of your current data will be changed. Any selection you have set will still be there after the operation.
All you need to do is open your table, click the “Edit” menu, and then click “Create Record Number Field”. The table does NOT need to be set to Editable prior to this. The tool will add a field named [rec_num] and populate it with record number values. If a field named [rec_num] already exists in your table, the tool will append an index number to the name until it finds a name that does not exist in your table (i.e. [rec_num_1], [rec_num_2], etc.)
![]()
Enjoy! Please contact the author if you have problems or find bugs.
Jeff Jenness jeffj@jennessent.com
Jenness Enterprises http://www.jennessent.com
3020 N. Schevene Blvd.
Flagstaff, AZ 86004
USA
![]()
Please visit Jenness Enterprises ArcView Extensions site for more ArcView Extensions and other software by the author. We also offer customized ArcView-based GIS consultation services to help you meet your specific data analysis and application development needs.
![]()