![]()
![]()
![]()
![]()
![]()
![]()
![]()

![]()
NAME: Identify Features Within Distance, v. 1.b (Click Name to Download)
AKA: id_within_dist.avx
Last Modified: August 3, 2003
TOPICS: ArcView 3.x, Nearest Feature, Distance, Bearing, Azimuth, View, Analysis, Tools, Centroid, Closest Edge, Adjacent, Range
AUTHOR: Jeff Jenness
Wildlife Biologist, GIS Analyst
US Forest Service, Rocky Mountain Research Station
2500 S. Pine Knoll Drive
Flagstaff, AZ 86001
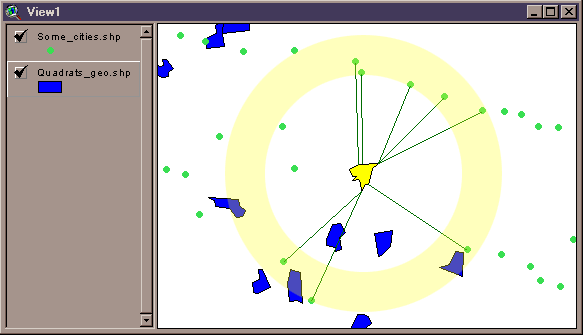
Description: This extension lets you identify features that are within a specified distance of each of a set of Input features. Begin by specifying a theme in the view which contains your INPUT features, then select a single or multiple themes containing your COMPARISON features. This extension will work through each of the Comparison features and check to see if it is within your specified distance of each Input feature. You have the option to draw graphic lines connecting each Input feature to the Comparison feature.
Two Output Tables: You have the option to choose either or both of two different output tables. These tables are permanent tables, saved to the hard drive, and will not be deleted when ArcView shuts down.
|
|
Results By Input Feature: This first table has two fields; one containing the Input Feature ID and the other containing a count of all the Comparison features that were within your specified distance. You have the option to join this table with your Input Theme Feature Attribute table if you want. |
|
|
Results by Comparison Feature: This second table lists each Comparison feature within the specified distance, and you have the option to include any of 16 fields containing ID values for the features, Theme Names, Centroid and Closest Edge Coordinates, and Centroid and Closest Edge Distances and Bearings. These fields are described in more detail in Step 6 of the manual. |
Several Measurement Choices: You have the option to identify features based on a variety of distance choices:
|
|
Features in which the closest edge lies within a specified distance. |
|
|
Features in which any part of the feature lies within a specified distance. |
|
|
Features in which the entire shape lies within a specified distance. |
Furthermore, for each of these three options, you have more options regarding the relationship the feature has to the distance:
|
|
Features that are closer than the specified distance. |
|
|
Features that are farther than the specified distance. |
|
|
Features that lie within a specified range of distances. |
These options are described in more detail in Step 5 of the manual.
Identify Features Within a Single Theme: You can select a single theme to act as both the Input theme AND Comparison theme, in which case this script will identify all other features in that theme that lie within your specified distance. It will NOT measure the distance to itself, so you'll never get a feature identified with itself within your specified distance.
All or Only Selected Records: You can either use all the features in each of the themes for the analysis or only a selected subset of features. If any features in a particular theme (input or comparison themes) are selected, then only those selected features in that theme will be used in the analysis. If no features in a theme are selected, then all features in that theme will be used in the analysis.
Projected vs. Unprojected Views: If your original data are in Lat/Long coordinates (the Geographic Projection) and your View has been projected, then this extension will identify features based on the Map Units of your view projection.
REQUIRES: This extension requires a minimum of one feature theme (Point, Line or Polygon theme) present in a view if you want to identify features within a single theme. Otherwise, a minimum of two feature themes are needed; one to act as the 'Input' theme and at least one 'Comparison' theme.
This extension also requires that the file "avdlog.dll" be present in the ArcView/BIN32 directory (or $AVBIN/avdlog.dll) and that the Dialog Designer extension be available in the ArcView/ext32 directory, which they almost certainly are if you're running AV3.1 or higher. You don't have to load Dialog Designer to run the extension; it only has to be available.
UPDATES: August 30, 2002 - The Version 1a update fixes a bug that produces an “Error in reading shape record length for record 1” error message.
August 3, 2003 - The Version 1b update makes some minor aesthetic changes.
![]()
GENERAL INSTRUCTIONS:
1) Begin by placing the "id_within_dist.avx" file into the ArcView extensions directory (../../Av_gis30/Arcview/ext32/).
2) After starting ArcView, Load the extension by clicking on File --> Extensions… , scrolling down through the list of available extensions, and then clicking on the checkbox next to the extension called "Identify Features Within Distance"
3) Select Input Theme:
Begin by clicking on the
![]() icon. This brings up the Input Theme dialog box:
icon. This brings up the Input Theme dialog box:
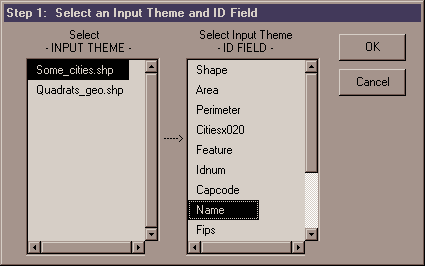
The – INPUT THEME – list shows all of the Feature Themes (those themes made of Points, Lines or Polygons) in the view. Once you select the input theme of interest, the –ID FIELD – list becomes active and shows a list of all the fields in the input theme’s Feature Attribute Table. You must select a field that contains a unique identifier for each feature. This identifier allows your RESULTS table to be joined with your input theme Feature Table, and it also necessary for you to know which input feature is being referred to in the RESULTS table.
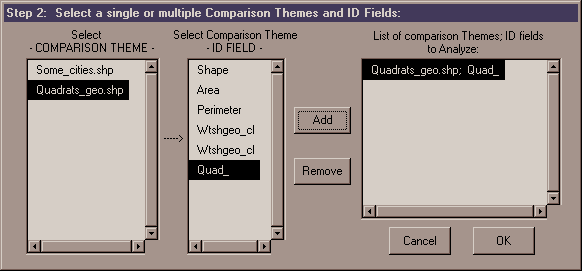
4) Select Comparison Themes and ID Fields: After you have selected your Input Theme, select either a single or multiple Comparison Themes. This dialog box works the same as the Input Theme dialog box except that you can add multiple Theme/ID Field combinations to the analysis. Notice that you can also include the Input Theme as a comparison theme. In this case, the program will check the distances to all features within that Input Theme EXCEPT itself (the closest feature to any feature will always be itself, but that information is rarely what users are looking for).
5) Select the Distance or Distance Range: After you have selected your comparison themes, you will see the following dialog box prompting you to specify the analysis you would like to conduct.
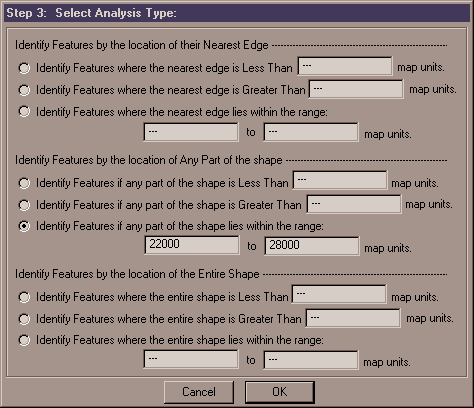
There are a number of ways you can identify features based on a specified distance, and this extension attempts to provide you with the most likely methods you will need. IMPORTANT: All these methods use either the "<" or the ">" operation, rather than the "<=" or ">=" operations. They will never include the feature if the distance is Equal to your specified distance. Also, all distances should be in Map Units, which are the units of the X/Y Coordinate system you are using, and which are the units of the X/Y Coordinates you see in the top right of your screen, right next to your Scale textbox.
You have three broad options regarding which part of the shape you're interested in (the closest edge, the entire shape, or any part of the shape), and each broad option has three sub-options related to your specified distance.
-
Identify Features where the nearest edge is Less Than ____ map units: This option will identify all comparison features whose closest edge is less than a maximum distance that you specify. Part of the identified line or polygon may lie outside of your maximum range in this case. This option can also be used to identify adjacent features by specifying a very small Distance value.
-
Identify Features where the nearest edge is Greater Than ____ map units: This option will identify all comparison features where the closest edge is farther away than a minimum distance that you specify.
-
Identify Features where the nearest edge lies within the range ____ to ____ map units: This option will identify all comparison features where the closest edge lies within a specified range. Part of the identified line or polygon may lie outside of your maximum distance in this case.
-
Identify Features if Any Part of the shape is Less Than ____ map units: This option will identify all comparison features in which any part of the shape lies within a maximum distance that you specify. Part of the identified shape may lie outside of your maximum distance in this case. This option gives identical results to the "Identify Features if the nearest edge is Less Than ___ map units" option described above.
-
Identify Features if Any Part of the shape is Greater Than ____ map units: This option will identify all comparison features in which any part of the shape lies outside of a minimum distance that you specify. Part of the identified shape may lie inside of your minimum distance in this case.
-
Identify Features if Any Part of the shape lies within the range ____ to ____ map units: This option will identify all comparison features in which any part of the shape lies within a minimum and maximum distance that you specify. Part of the identified shape may lie outside of your specified range in this case.
-
Identify Features where the entire shape is Less Than ____ map units: This option will identify all comparison features in which the entire shape lies within a maximum distance that you specify. No part of the identified shape will lie outside of your maximum distance in this case.
-
Identify Features where the entire shape is Greater Than ____ map units: This option will identify all comparison features in which the entire shape lies outside of a minimum distance that you specify. No part of the identified shape will lie inside of your minimum distance in this case. This option gives identical results to the "Identify Features if the nearest edge is Greater Than ___ map units" option described above.
-
Identify Features where the entire shape lies within the range ____ to ____ map units: This option will identify all comparison features in which the entire shape lies within a minimum and maximum distance that you specify. No part of the identified shape will lie outside of your specified range in this case.
Identify Features by the location of the Nearest Edge:
Identify Features by the location of Any Part of the shape:
Identify Features by the location of the Entire Shape:
6) Select which Output Tables to Create and which Fields to include: You have the option to calculate two different RESULTS tables, and you have the choice between a number of data fields to include.
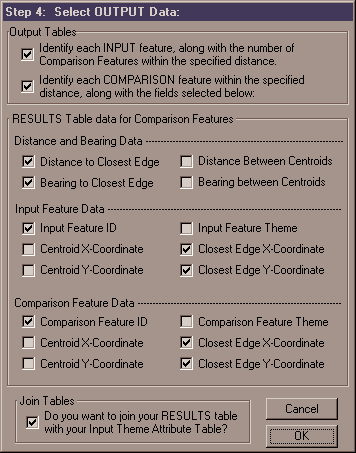
RESULT Table #1: Identify each Input Feature: This RESULT table has a record for each Input feature that identifies it and gives a count of the number of Comparison features that were within the distance. You have the option to automatically join this table to your Input Feature Attribute Table if you like. This join can always be removed by hitting the "Remove All Joins" option in the ArcView Table Menu. The two fields are:
|
|
Input Feature ID: This field contains the Input Feature ID values selected in Step 3 that identify each input feature. |
|
|
Count of Features: This field contains a number specifying how many Comparison features were within the specified distance of that Input feature. |
RESULT Table #2: Identify each Comparison Feature: This RESULT table has a record for each Comparison feature that was within the specified distance of all the Input features. You have the option to choose among 16 data fields to include in this table:
|
|
Input Feature ID: This field contains the Input Feature ID values selected in Step 3 that identify each Input feature. |
|
|
Input Theme Name: This field contains the name of the Input theme. |
|
|
Comp Feature ID: This field contains the Comparison Feature ID values selected in Step 4 that identify each Comparison feature. The data type of this field (i.e. String, Decimal, Integer, Date etc.) is copied from the data type of the field selected in Step 4. HOWEVER, in cases where multiple Comparison themes are used, and the data types of the respective ID fields are not the same (i.e. one ID field may be numeric while another ID field may be a string), then this field will be set as a STRING field and all ID values will be converted to strings. |
|
|
Comp Theme Name: This field contains the name of the Comparison theme that the Comparison Feature came from. Remember that you can have multiple comparison themes. |
|
|
Edge Distance: This is the distance between the two closest points on the Input Feature and Comparison Feature, in map units. |
|
|
Edge Bearing: This is the bearing (or azimuth) from the Input Feature to the Comparison Feature, in degrees. |
|
|
Centroid Distance: This is the distance between the centroids of the Input Feature and the Comparison Feature, in map units. |
|
|
Centroid Bearing: This is the bearing (or azimuth) from the centroid of the Input Feature to the centroid of the Comparison feature, in degrees. |
|
|
Input Edge X: This is the X-coordinate of that point on the Input feature that is closest to the Comparison feature. |
|
|
Input Edge Y: This is the Y-coordinate of that point on the Input feature that is closest to the Comparison feature. |
|
|
Comp Edge X: This is the X-coordinate of that point on the Comparison feature that is closest to the Input feature. |
|
|
Comp Edge Y: This is the Y-coordinate of that point on the Comparison feature that is closest to the Input feature. |
|
|
Input Cent X: This is the X-coordinate of centroid of the Input feature. |
|
|
Input Cent Y: This is the Y-coordinate of centroid of the Input feature. |
|
|
Comp Centroid X: This is the X-coordinate of centroid of the Comparison feature. |
|
|
Comp Centroid Y: This is the Y-coordinate of centroid of the Comparison feature. |
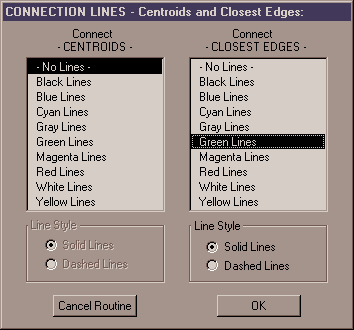
7) Specify Any Desired Graphic Connection Lines: You have the option to create graphic lines on your view which connect each Input feature to all the Comparison features that were in the specified distance. This option is useful when you want visual confirmation that the extension is identifying the correct features.
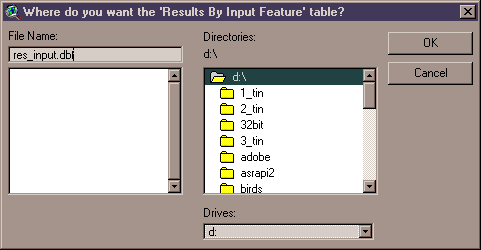
8) Specify Hard Drive Location to save the RESULTS tables: You will be prompted to specify a location on the hard drive to save each RESULTS table you have chosen to calculate. These are standard ArcView Dialog Boxes and should be familiar to most users. These tables are permanent tables and will not be deleted when ArcView is shut down.
Enjoy! Please contact the author if you have problems or find bugs.
Jeff Jenness
jeffj@jennessent.com
3020 N. Schevene Blvd.
Flagstaff, AZ 86004
USA
![]()
Please visit Jenness Enterprises ArcView Extensions site for more ArcView Extensions and other software by the author. We also offer customized ArcView-based GIS consultation services to help you meet your specific data analysis and application development needs.
![]()